 Week 50 finally got me to try screen printing. I had a canvas drop cloth that I had used to catch my paint when I worked on projects. It got a little muddy as there were multiple colors dumped on this over the year. I had purchased some thermofax screens off of ETSY. I had set them in a drawer a bit intimidated to try them. I decided to try them on my canvas drop cloth. I couldn't hurt anything utilizing that piece of fabric. I used actual screen printing ink. This sets on top of the fabric as opposed to dies which actually change the color of the fabric. I used two different kinds of ink, jacquard and speedball. The colors I used were Magenta, Turquoise, White, and Raspberry. This technique is so easy. The screens can be washed with warm water. I used an old gift card to pull the ink across the fabric. I didn't add any stitching to this piece as I liked it just the way it was!
Friday, December 30, 2011
Week 50 Dimension
Week 50 finally got me to try screen printing. I had a canvas drop cloth that I had used to catch my paint when I worked on projects. It got a little muddy as there were multiple colors dumped on this over the year. I had purchased some thermofax screens off of ETSY. I had set them in a drawer a bit intimidated to try them. I decided to try them on my canvas drop cloth. I couldn't hurt anything utilizing that piece of fabric. I used actual screen printing ink. This sets on top of the fabric as opposed to dies which actually change the color of the fabric. I used two different kinds of ink, jacquard and speedball. The colors I used were Magenta, Turquoise, White, and Raspberry. This technique is so easy. The screens can be washed with warm water. I used an old gift card to pull the ink across the fabric. I didn't add any stitching to this piece as I liked it just the way it was!
Thursday, December 29, 2011
Week 49 Ocean
 This journal quilt was inspired by my recent snorkeling adventure near St. John's. I used my needle felting machine to make the background. I used multiple colors of blue wool. I then added some sheer fabrics. Some of the variety has come from old clothing. I then added metallic embellishments. I used charms and buttons for the star fish. I used packaging material for the net. The pearls and beads were finds from a rummage sale. I then used thin foil in copper and silver to make the porpoise and dolphin. The tag is a metallic dog tag that says "ocean". I need to wait for a sunny day here in michigan to take this picture without a flash. It might be spring before that happens!
Wednesday, December 28, 2011
Postcard #6 Dress to Impress
 This fabric post card was made with many type of mixed media I started with a canvas fabric. It was stamped using ranger inks. Additional ephemera was added in the form of paper. The dress form was cut from an upholstery fabric remnant using a Tim Holtz die. The 3 dimensional effect was added with buttons and a metallic number.
Monday, December 26, 2011
Gift Tag #5 Flowers
 Gift Tag #5 was made with iridescent paper. I then decoupaged ephemera. I chose a floral paper and a paper from an old grammar book. I then stamped script across the tag. It was finished with a button.
Saturday, December 24, 2011

Friday, December 23, 2011
Ornament #15 Snowflake
 The snowflake was one of the easiest ornaments to make. I saved it for last as this can be so much for to make with kids on Christmas Eve. If you are one of those people who go out shopping after Christmas for the deals, then this is for you. I managed to pick up these glitter snow flakes that were intended to be gift tags. I took each one out of the package. The had plain white glitter on the front. I then added whatever embellishment I could find. Scrap booking do dads are great for this. I made many different kinds. My favorite is the snow flake on top of the snow flake. This is my little nudge for a white christmas!
Week 48 Shoes

 Week 48 is a quilt about shoes. We are back on track and going to finish the year in order, sort of! I love vintage advertising and vintage images. I was tickled when I found a copy right free book of shoe images. It is called Memories for a lifetime: Shoes and is by Karey Judd. I used one page of images to print onto fabric. I added some ribbon to divide the quilt square. I then took some additional images from the shoe book and copied them onto transparencies. This was done earlier in the year and is a technique by Ruth Rae. I sewed the transparencies on three sides. I filled them with glitter, beads, and stampendous fragments (bronze). I then closed them by stitching them along the top. I added a dictionary page, an old shoe earring, three scrapbooking flowers, and two buttons. Voila, a vintage shoe quilt. For those of you shopping today, may you have very comfortable shoes!
Wednesday, December 21, 2011
Ornament #14 The Cardinal
 Birds can be so simple, yet so amazing. This is one of the easier ornaments, but looks pretty amazing when there are multiple on the tree. Take a fabric that already has gold thread designes. This one had some large floral motiff. I cut the fabric with the Accuquilt Go and the Cardinal Die. I then stitched the cardinal to another cut out of a cream fabric with some body. I used canvas. I stitched around the edges with gold metallic thread. May your Christmas be shiny and bright!
Tuesday, December 20, 2011
Cookies From My Favorite Girls
 Check out these perfectly decorated cookies. They were made by my favorite girls Rylee, Miranda, Taylor and Sue. I am supposed to bring one tray to work. That just may not happen! Thanks girls!!!
Monday, December 19, 2011
Week 51 Journey

 We all know that Week 51 is supposed to come after Week 48. I decided to throw all caution to the wind and post week 51 today. This art quilt is a one of 6 finalist for the quilting arts "Affirmation" Quilt Challenge. The purpose of this quilting challenge was to make an art quilt that was 10" X 10" that contained an affirmation or an affirmative word. I chose journey as I have always been more about the destination. I put the affirmative word as the license plate. This quilt took me over 20 hours to complete. A lot of the work was in the hand stitching. What made this piece so much fun was that the block of buildings in the background was made from fabric that I hand dyed with old silk ties. A technique that I learned in Quilting Arts magazine. That piece of fabric was chosen to be featured in Cloth Paper Scissors magazine last spring. I used all scrap fabric to construct this quilt. I also used paper, metal foil, thread painting, beads, embroidery stitches, plastic, and sequins to embellish. This was such a pleasant surprise to find my name on the website as a finalist. This quilt was quite a journey and I am so happy to share it with you. May you all have a peaceful journey this holiday season.
Sunday, December 18, 2011
Ballerina Slipper

Every year the Crooked Tree Arts Center in Petoskey Michigan has a Christmas Open House. The ballet dancers decorate their shoes to raise money for their summer classes. I purchased this ballet toe shoe. It was made by Joyce Richey. I got to pick from about 20 different styles. They were all decorated differently. The creativity was amazing. This ballet shoe hangs in my studio as a very creative piece of artwork. It also represents those young individuals with a passion for what they do and the hard work they put towards achieving their goal.
www.crookedtree.org/
Saturday, December 17, 2011
Ornament #13 Santa is Coming to Town
 Jolly Kriss Kringle paper was used for this ornament. Sometimes it is hard to improve on a good thing. This paper has the vintage or antique feel with yellows, creams and faded greens. I took this paper and cut out the portion that I wanted to use as the ornament. I then used Tim Holtz Stickles to paint the green chair. The stickles adds some glitter. It is easy to use at the base is clear. I then added some buttons. Voila a vintage ornament for the tree. May your season be Jolly and full of memories!
Friday, December 16, 2011
Christmas Ornament #12 Thread and Bells
 This ornament was so much fun. I have a lot of "do dads". I have been waiting to use them for something special. After 5 years of nothing special coming up, I decided to use them for some Christmas ornaments. I had this collection of small old spools with thread on them. I thought the red and green would look great together. I also thought that this bell would round out the Christmas look. I plan on making a few more of the whimsy ornaments out of some of my older treasures. May you jingle all the way to Christmas.
Thursday, December 15, 2011
Ornament #10 and #11 Facets
 These two ornaments were done using the Tim Holtz "Facets". I prefer to call them crystals. These ornaments are so easy to make. You just need to select the image and use a clear craft glue to adhere them to the back of the crystal. You can use art images, family photos, or any ephemera. The two images came from an old magazine advertisement for a museum. The one on the right is of Mary and Christ. I thought that if fit this crystal well and is so symbolic of the season. The one on the left is a Jan Van Eyck painting. I wrote an entire paper on this piece of artwork last fall for an Art and History class. I was absolutely fascinated by the symbolism in this piece. It was completed in 1434 and was done in oils. It had been thought to be a marriage certificate as witnessed by the artist. There is much mystery and controversy surrounding the meaning of this painting and the symbolism within. I thought the colors were so vibrant in this piece and it holds significant meaning to me since it was my first final exam paper in an art class!
Wednesday, December 14, 2011
Ice Dyeing-Dye your own Fabric
 This fabric was hand dyed. I did use the ice dying technique that I have blogged about before. This one was quite a surprise. The colors I used were mink brown, truffle brown, jet black and charcoal grey. I was very surprised with what I achieved. I enjoy this technique very much as there is so much serendipity involved. I can hardly wait for it to snow as this technique was originally designed for snow, ice was just a substitute. I may have to wait awhile as tomorrow it is going to be 50 degrees here. I am sure soon enough though, I will have bins all over the house filled with snow and dye!
Monday, December 12, 2011
Week 47 Felted Wool

 This quilt square was done after watching Jane Lafazio on quilting arts TV season 800. I have a felting machine and have used in previous quilt squares. This segment on Quilting Arts was so awesome. It inspired me to try something completely different. Using an old wool sweater I began to felt wool and silk roving in three main colors: orange, yellow and red. After felting the roving I added fabric, ribbon and then thread. After this was finished I added three embellishments that were silver and gold. If you haven't tried felting, I highly recommend it. It is so much fun to watch the colors blend. What is even better is that you can cover up an area that you don't like without much effort.
Christmas Ornament #9 Peace
 This ornament was made very similar to the Noel and the Hope ornaments. The gold paper was embossed. A sizzix star die was used for the ornament. The silver brushed paper was cut using the Tim Holtz Peace die cut. This is one of my favorite ornaments. May you and all those you love find Peace this holiday season!
Sunday, December 11, 2011
Christmas Ornament #8 Noel
 This christmas ornament was made entirely with scrap book paper. The silver paper was embossed with a Christmas motif. The gold paper was also embossed with a different embossing folder. The Ornament was cut from a Sizzix die and the Noel was cut using a Tim Holtz die. May your holidays be filled with peace.
Saturday, December 10, 2011
Christmas Ornament #7 Mary and Angels
 This ornament was made using a Tim Holtz crystal and some ephemera. The ephemera was cut to fit behind this crystal. It was adhered using a clear art glue. This was very simple but with the lights on the tree it looks very ornate.
Friday, December 9, 2011
Christmas Ornament #6 Hope
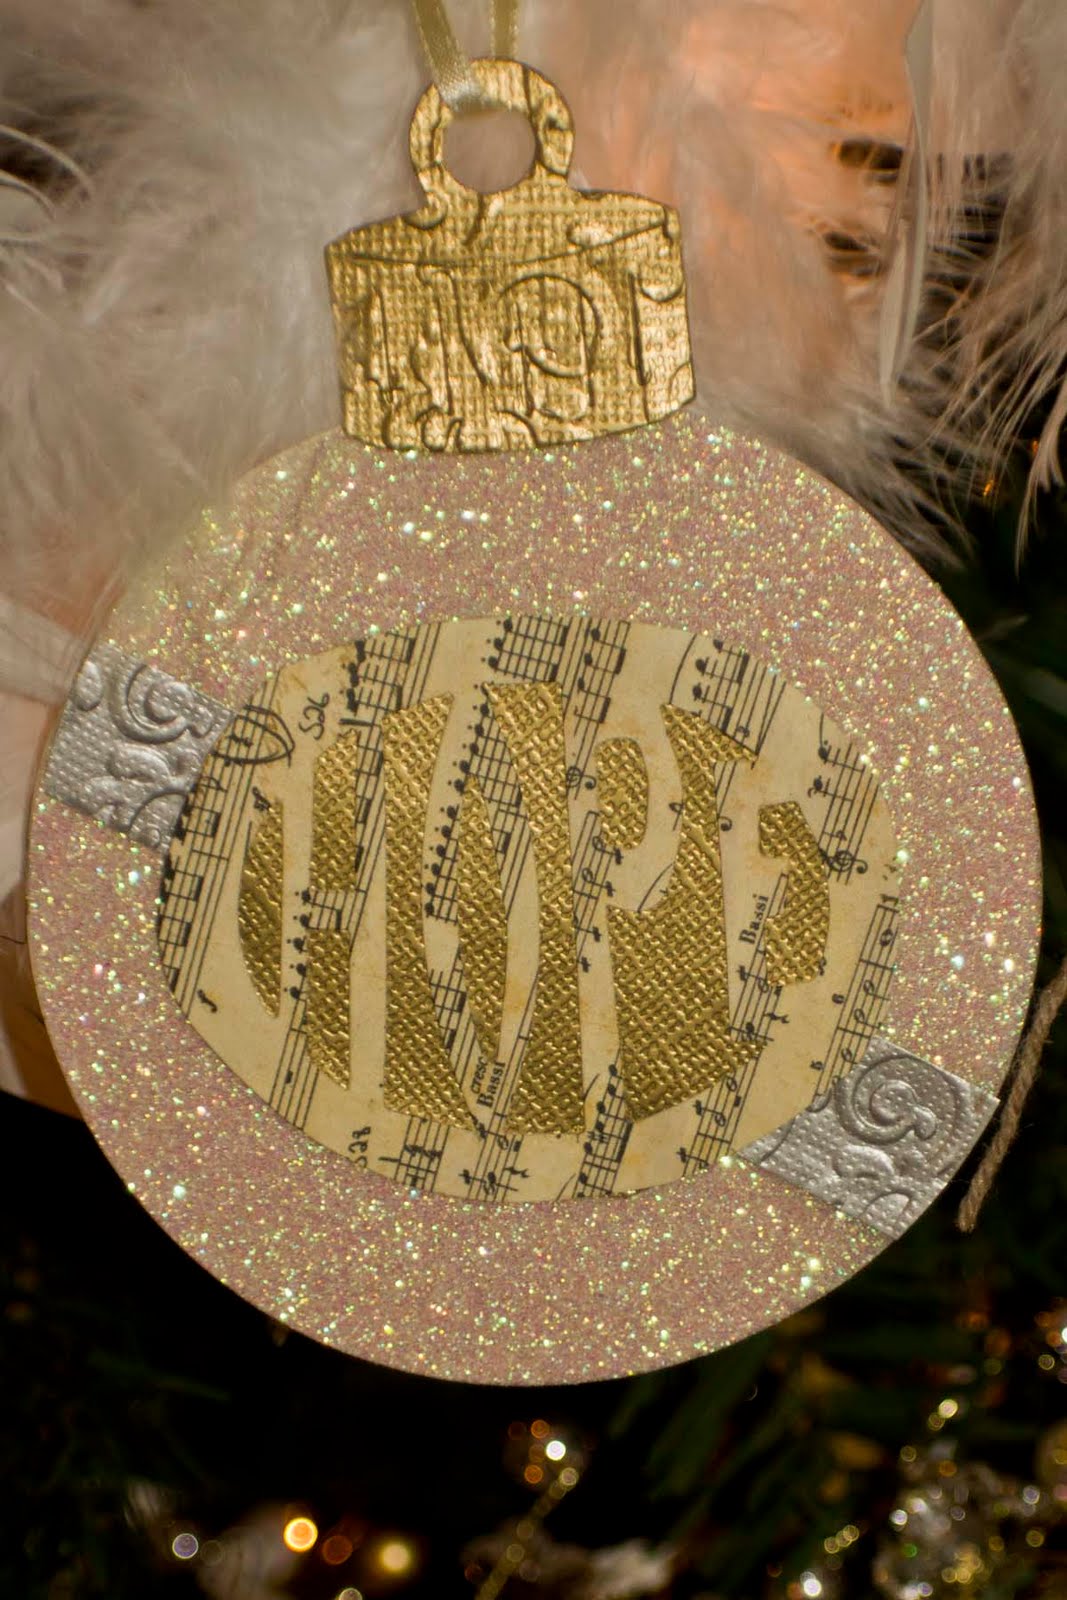
Ornament #6 was made with paper. There were four types of paper used. A glitter paper with a sticky back was used for the actual ornament. This was a sizzix die used with the die cutter. The silver paper was first embossed and then cut into a strip. It was placed across the bulb. The gold paper was also embossed and was cute for the ornament top. The word hope was cut using the Tim Holtz Hope die cut. It was layered on gold foil paper.
Tuesday, December 6, 2011
Christmas Ornament #5 Snowflake
 This ornament was made using the sizzix die cut. Cream wool fabric was used for the front of the ornament. The manilla folder was used for the back. Beads were sewn on the edges. An old button was finished using Rub 'n buff gold leaf.
Let it Snow!
Sunday, December 4, 2011
Christmas Ornament #4 Snowflake
 This snow flake ornament was made from a cream colored wool fabric. It was backed with a recycled manilla folder. The snow flake shape was cut with the accuquilt go cutter. I then embellished the snowflake with various beads and a vintage button in the center. I used rub 'n buff silver leaf to mask the rust on the button.
Let it snow.
Christmas Ornament #3 Keyhole
 This ornament was made with a faux swede fabric. It was cut using a die cut by sizzix. The cut an old manilla folder to stabilize the back. I added Tim Holtz music notes tape. Using metallic gold thread, I stitched the manilla folder and fabric together. Next, I had these rather inexpensive plastic beads in strips that were obtained at a yard sale. I was able to hand stitch those on with clear monofilament thread. I then stitched on the silver key hole that is from the Tim Holtz collection. Happy Holidays!
Saturday, December 3, 2011
Christmas Ornament #2
 The second christmas ornament was made from a bird die cut. This time I used my accuquilt die cut machine. It is just as fabulous as my vagbond. The fabric was a velveteen. The fabric was stamped with an antique brown ink and a snowflake stamp. The wing was made from a scrap of music note fabric. A bead was sewn on for the eye. To make the ornament a little more sturdy I backed it with a matching die cut from an old manilla folder.
 The theme this year is cream, gold, and silver. So far I am enjoying this immensely. I hope you are too.
Thursday, December 1, 2011
Christmas Ornament #1
 This ornament was made using the Sizzix die cut. The ornament was stamped onto an old manilla envelope. The top piece was covered in glue and then glitter was applied. The bird was a Fiskers punch and was made from scrap book paper. The back of the ornament was music note scrap book paper. It was covered with wax paper. The space in between was filled with glitter and beads. Happy Holidays
Wednesday, November 30, 2011
Fabric Book Evergreen Branch
 The fabric book that I submitted to the Quilting Arts Magazine Challenge contained all things Michigan. I did a page with a map of Michigan. This was done using a velvet background for the great lakes. The upper and lower peninsula were made using fusible web, paper and corduroy fabric. Unfortunately there was no die cut for the state so it was traced from a map onto the fusible web and then ironed onto the fabric. The capital of Lansing was highlighted with a red button for it's location and a paper tag was affixed to the button. The metallic letters MI were added for a three dimensional embellishment symbolizing the state. The edges were finished with lace bias tape.
Monday, November 28, 2011
Gift Tag #4
 Gift Tag #4 uses scrap book paper for the base. The flower is made from scrap book paper and old book pages. The die cut was done on the vagabond and uses the Sizzix flower die. A stamp with embossing powder was used to add dimension. A button was used a final embellishment.
Sunday, November 27, 2011
Week 46 Noel
 Week 46 Journal Quilt is all about the Holidays.
I love putting up my christmas tree and decorating for the holidays. This journal quilt started with a piece of painted canvas. The background was done by using Glimmer Mist and a stencil with snow flakes. Using the Vagabond by Tim Holtz, the Christmas tree was die cut from metallic scrap booking paper. The ornaments are sequins that are layered and affixed with beads. Shaved ice by stampendous was glued to the bottom to make the snow. A fabric scrap was used for the tree skirt. The packages were made for scrap booking, but finished this tree off perfectly. Happy Holidays!
Thursday, November 17, 2011
Fabric Book Evergreen Branch
 This fabric book page was included to use a natural embellishment. I was able to use a fallen branch from an evergreen tree. The background was muslin which was stamped with a leaf pattern using permanent ink. The branch was sewn into place using clear thread.
Wednesday, November 16, 2011
Post Card #5 Hope
 Affirmation words are some of my favorite themes for my artwork. One of my favorite words is HOPE.
This post card was made with a background from an upholstery sample. The ephemera is from old books and scrap book paper. The Ticket with the word hope is from the Tim Holtz collection. The mustard thread was added on the edges using a decorative stitch on my sewing machine. A scrabble letter was added to provide some dimension and added interest.
Tuesday, November 15, 2011
Fabric Book Petoskey Stone Page
 When I made the fabric book representing Michigan icons. I couldn't resist making a page about the petoskey stone. Th background was muslin fabric that had words printed across the page for a background. All of the words were related to Michigan. The petoskey stone photograph was printed on Vellum and sticked to the background with a zigzag stitch.
 The Petoskey Stone are fossilized colonies of corals (Hexagonaria percarinata.) Their origin is from the Devonian seas that covered lake Michigan about 350 million years ago.
Monday, November 14, 2011
Gift Tag #3 L'Arc de Triomphe
 Gift Tage #3 represents all things Paris. I used an image from ephemera. It was stamped with a postage cancellation stamp. A dictionary quote for "arc" was added. The base tag is made from metallic scrap book paper. The whole feel of this tag is vintage travel. Perfect for any gift.
Sunday, November 13, 2011
Post Card #4 Sail
 This fabric post card was made by using an upholstery scrap for the base. An old map was sewn in place. This was topped with two pieces of fabric that were sewn togther. The muslin was stamped with a collection of boats. This was attached to the deep blue fabric. The letters were added with fabric glue. With winter coming, sailing is a long way away, but a happy memory of summer.
Saturday, November 12, 2011
Week 45 Full Moon
 Week 45 Journal Quilt was made after I watched an amazing full moon rise over northern michigan. Unfortunately I didn't have my camera, all I have is the memory. I used pieced applique to make this quilt. Different types of fabric were used to construct the quilt square. The moon was made of a pale yellow satin. The tree was made from a tree bark type fabric that I found at one of the local quilting stores. The owl was made from an upholstery scrap. He was thread painted for detail.
Friday, November 11, 2011
Fabric Book Chalk Bird
 A little over a year ago I entered one of my first reader challenges for Quilting Arts Magazine. It was for a fabric book. I took images from some of my favorite Michigan photographic memories. This bird originated from a photograph of an amazing bird statue that is made from metal repurposed parts. I took a picture of this bird which stands in front of an art gallery. I then used a filter in photoshop to provide an outline. I used chalk to "paint" the surface. Machine stitching was used to finish of the piece. The book was 6" X 6" and had 6 pages that are folded in accordion style. The book sits on the buffet table in my living room. I have made a number of projects since this book. I enjoy looking at this project as it was "the kick off" for many fun projects to come.
Thursday, November 10, 2011
Transforming a Discarded Trash Can
 I love to take a discarded item and repurpose it. This old trash can was just plain metal that, although a little rusty was still in good condition. I was able to prime and paint the trash can. I painted letters that I had gotten on clearance from a local craft store. I then covered them with a collection of clear/white buttons. The lace trim that is in the background was purchased at a summer yard sale. The color palette is that of my studio.
Wednesday, November 9, 2011
Gift Tag #2 Taking Off
 Gift Tag #2 is done on black card stock. I used the Perfect Pearls to create the birds. The product is done by Ranger. They come in powder form. There are many colors too choose from. There are many ways to use them. I did this by stamping the birds with Perfect Medium, (Ranger). I then used a brush to put the perfect pearls onto the stamp. A stamp that says "All who Wander are Not Lost" is the purple banner across the middle of the tag. "Taking Off" was glued on and comes from magnetic poetry! This Gift Tag is perfect for someone who is graduating or starting a new endeavor. May you Enjoy the Journey.
Sunday, November 6, 2011
Week 44 Fall Leaves

 The journal quilt for Week 44 was in reference to the thousands of leaves I have raked this fall. I have two very large maple trees. There leaves turn yellow with some red. The leaves fall very late as compared to other trees. The background is remnant fabric. I loved the texture and color of this fabric. It has a sheen to it that gives it such a unique dimension. The pumpkin is made of paper. The leaves are chip board. The pumpkin and work "fall" are sewn on. The leaves are adhered using fabric glue. A fun trim that I found on clearance is used for the edge. I hope your fall was as perfect as mine.
Post card #3 Travel Paris
 Fabric Post Card #3 is from Paris. With a image of the city, the postcard is embellished with metal adornments, beads, and a tag with a stamp of a paris postage stamp cancellation. The background is made from upholstery fabric from a sample book.
Saturday, November 5, 2011
Gift Tag #1 Brilliance
 Gift tag #1 is all about the style. This image although vintage just radiates confidance. I used Tim Holtz paper for the background. An old dictionary was used for the word fashion which is tucked behind the woman. Brilliant Style was cut out of a book for added text. Finally a tag shapped die cut was used to make the tag. I used the vagabond to cut the tag. (I know enough with the vagabond cutter already.) May you find yourself just absolutely brilliant. Got a tag that you would like posted here? Email me at artfulembellishments@earthlink.net
Tuesday, November 1, 2011
Ice Dyeing-Dye your own Fabric

Ice Dyeing was featured in Quilting Arts Magazine in the August/September Issue of 2011 Volume 52. This technique is so much fun. The article was written by Lynda Heines. I am so grateful she shared her technique. It is a fun way to make your own tie die fabric and it is easy to do. This is a piece of fabric that is being entered in the Quilting Arts Dye Your Own Fabric Challenge.
Monday, October 31, 2011
Week 43 Trick or Treat
 Journal Quilt 43 was done with a little bling bling in mind. The pumpkin was actually a wall decoration. The trick or treat was a scrap book paper die cut. It was embellished with individual Tulip gems. This was a simple quilt square, but so much fun to look at. I hope you had a Happy Halloween.
Saturday, October 29, 2011
Week 42 The Black Cat
 The Week 42 journal quilt is a true three dimensional quilt square. The background is iridescent orange. A black cat was appliqued onto the quilt square. Black ticking was used to bind the edges. The word "spooky" is chip board and was attached with fabric glue. The glow in the dark bats are rubber. They were hand sewn onto the quilt square. The small purple and silver bats were confetti. They were individually placed around the edges with fabric glue. Happy Haunting!!
Friday, October 28, 2011
Silk Tie Dying -Dye your own fabric.

So you can't find that original fabric at a quilt store? Why not make your own? Quilting Arts magazine has a Fabric Swap challenge. You can use any fabric and any technique for altering the fabric. You can dye, paint, discharge, stamp, stencil to alter the fabric. After submitting 4 fat quarters, Quilting Arts will send you back fabric from other contributors. I participated in this for Cloth Paper Scissors magazine and was thrilled with the fabric that I received. I was so happy that Quilting Arts is hosting the same challenge. This is a piece of silk dupioni silk that has been dyed using old silk ties. For the complete instructions see Quilting Arts magazine, Issue 47, Oct/Nov 2010 by Kathy Barinholtz. This is being entered in the Quilting Arts Challenge due November 7, 2011.
Eccentric Gift Cards

Well Tis the season! We all know that the next two months are going to go by so quickly. I was looking for an avenue to make small art. It is always fun to complete a project. Sometimes I start a large or complicated project and I get discouraged because I never seem to finish. Hence, the gift card, small, functional, and just in time for the holidays. I will be featuring gift tags that I have made in the upcoming months. I look forward to sharing them with you.
Saturday, October 22, 2011
Fabric Postcard #2 Leaves are Falling....

 This fabric post card was made with upholstery fabric. The blue background was selected and cut with pinking shears. The tree was cut using the vagabond and a Tim Holtz tree die. The leaves were all yellow and came in a package that I had picked up at a yard sale. I painted some of the leaves yellow and red. They were adhered with glue. The picture is from State Street in Harbor Springs, which is in Norther Michigan. The perfect fall postcard!
Subscribe to:
Posts (Atom)