Welcome!

Thank you for visiting artful embellishments. This is the third year for this blog and I am so happy to keep publishing. I started in 2011 and began with a quilt of the week, this lead to the leaf of the week for my newly designed paper tree that is located on the wall of my garage in 2012.......2013 is going to bring a lot of excitement and positive change. As a personal challenge for 2013, I plan on designing a artist trading card each week to be featured on the blog.
With so many interests, there will be quilting, art quilting, leaves (and more leaves), as well as experiments in thermofax screen printing, fabric dying, and tons of DIY recycle projects. I may even enter that altered fashion scene. To a happy and healthy 2013, may we all find happiness in those things we create....thank you for stoping by artful embellishments.

Wednesday, February 22, 2012


This tree was cast off after halloween. Despite it's eerie appearance I couldn't help but fall in love with it. I have hung multiple birds and owls onto it in my Studio. Some of the birds I have received as gifts and others are old Christmas tree ornaments. I love the whimsical appearance of this tree year round with all of it's feathered friends.

Sunday, February 19, 2012

Fearless

Fearless was a challenge that was sponsored by the Stampington Company. I chose to alter a children's book with a description of my quest for an art degree. (Which has temporarily been put on hold.) The cover was made using scrap book paper, furniture trim and letters from a number of sources.

Saturday, February 18, 2012

Eye Pocket #3

Eye Pocket #3 was made from both fabric and scrapbooking supplies. The actual eyeglass case was painted with pink fabric paint. The ribbon was added along the edge. (This is a great use for scraps.) I then used my Tim Holtz Vegabond with sizzix dies to cut the paper flowers. The flower that is in the middle is actual made from small fabric flowers that were found in the scrap booking section of my local craft store. Bric Brac ribbon was used to make the stem connecting the three flowers. The flowers were embellished with paints and buttons for the center. This eyepocket holds my favorite tools needle nose plyers and exacto knife!

Friday, February 17, 2012

Leaf #4 Happy Valentines Days

Leaf number four is for valentines day. So sorry it is a little late. The valentine leaf was made using an old sweater. The sweater was felted using wool roving. The leaf shape was cute using the accuquilt go cutting system. I then embellished with a heart and metallic letters that say Be Mine!

Tuesday, February 7, 2012

Paper Fabric

This fabric was made using a technique that was on Quilting Arts Season 1. The originator is Beryl Taylor. This fabric involves paper, muslin, acrylic paints and scraps of tissue paper. This is one of the most original ways to design your own fabric. I had such a great time making this fabric and will feature it in an upcoming art quilt.

Sunday, February 5, 2012

Draw, Paint, Photoshop


I had taken a photoshop class at Delta College. It was such a great experience. I have begun to use my own photographs in my art quilting. Starting with a favorite photograph, I take them into photoshop and alter them. Following the alterations, I then turn them into a quilt using fabric.

Last spring I took Alisa Burkes online class called Sketchbook delight. In this fabulous online class I learned how to sketch and to use water colors.

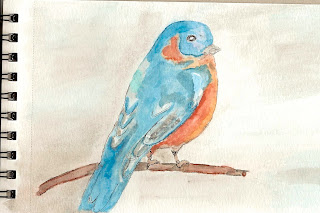
In my sketch I did this blue bird. I pulled it into photoshop and began altering the photo using the color invert and posterize function. The results were funky and fun. I plan on using these alterations of the sketch to enter the Quilting Arts Contest called "Sketch".

Saturday, February 4, 2012

Leaf #3

Leaf #3 is made from an old sweater that has been felted with wool roving. Some of the wool roving is spun. The remainder is died wool that has not been spun. Colored thread was used to make the leaf veins.

Thursday, February 2, 2012

Leaves! Leaf #1 and Leaf #2


The leaf project was my goal for 2012. A new years resolution of sorts. I plan on making at least one new leaf with a variety of materials each week to place on my tree. If you remember from back in November I had designed a life sized tree on my studio wall.

Both leaves were made using fabric that was hand dyed and sent to me through the Quilting Arts Fabric Challenge. The first fabric was done by Debra Olson. She placed fabric on an aged grate. It was then printed with Dye-na-flow ink using foam strips which were glued to card board to make a stamp. The rust came through onto the fabric for an amazing addition.

The second leaf was made from fabric Deb Sorem. She used a mono plate with tag board. She had used yarns and cords as the actual surface texture. She allowed to dry, sprayed with mod poge and then brushed on acrylic medium matte finish. The results are amazing, the fabric looks 3D without any additions.

Taking this fabric that I was lucky enough to receive, I cute the shapes using Sizzix dies. These were the Tim Holtz dies. The leaves are slightly smaller, but still provide that whimsical leaf shape. I then stitched the fabric leaves onto craft felt for stability!

Thank you Deb and Debra for adding to my growing tree!

Wednesday, February 1, 2012

Postcard#7 Friends

This fabric postcard was done using a variety of ephemera. An old picture of two children is the focal point. A piece of fabric from a upholstery book was cut to 4 X 6 for the background. This fabric was stamped with multiple types of Ranger Distress Ink. An old playing card that had yellowed with age was added. Machine free motion stitching was completed. As a final 3D embellishment, the word "play" was sewn on with twine.